True 7.1 Surround on Any Headphones
HeSuVi turns standard stereo headphones into a full 7.1 surround system. It uses real HRIR profiles from Dolby Atmos, DTS Headphone:X, Windows Sonic, and a dozen other surround engines.
What Is HeSuVi?
A free Windows tool that brings real 7.1 surround sound to any pair of headphones, powered by the same HRIR profiles used in commercial spatial audio engines.
Surround sound without the speakers
HeSuVi (Headphone Surround Virtualization) takes 7.1-channel audio and converts it into binaural stereo that your brain interprets as spatial sound. The result: positional audio through regular headphones, whether you are gaming, watching movies, or mixing music. It works by loading Head-Related Impulse Response (HRIR) profiles and applying them through Equalizer APO’s convolution engine.
What makes HeSuVi different from basic virtual surround is its library of HRIR profiles. You get access to profiles from Dolby Atmos for Headphones, DTS Headphone:X, Creative SBX Pro Studio, Sennheiser GSX, Windows Sonic, and over a dozen other systems. These are the same spatial audio algorithms sold commercially for $15-$20, available here at no cost. You can switch between them instantly and compare which profile sounds best with your particular headphones.
Built-in headphone EQ
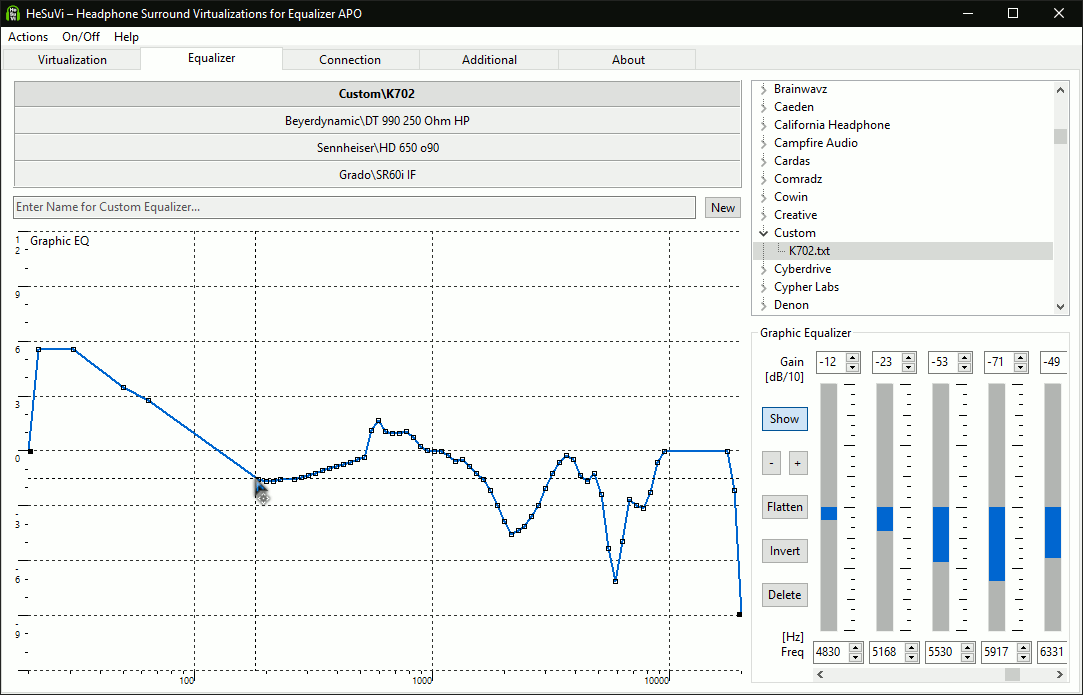
HeSuVi includes a graphic equalizer with over 1,000 headphone-specific correction presets sourced from AutoEq, oratory1990, and Innerfidelity measurements. Pick your headphone model from the list, and HeSuVi flattens the frequency response before applying spatialization. This matters because HRIR accuracy depends on a neutral frequency curve. Without correction, bass-heavy headphones tend to sound muddy with surround virtualization, while bright headphones can get fatiguing.
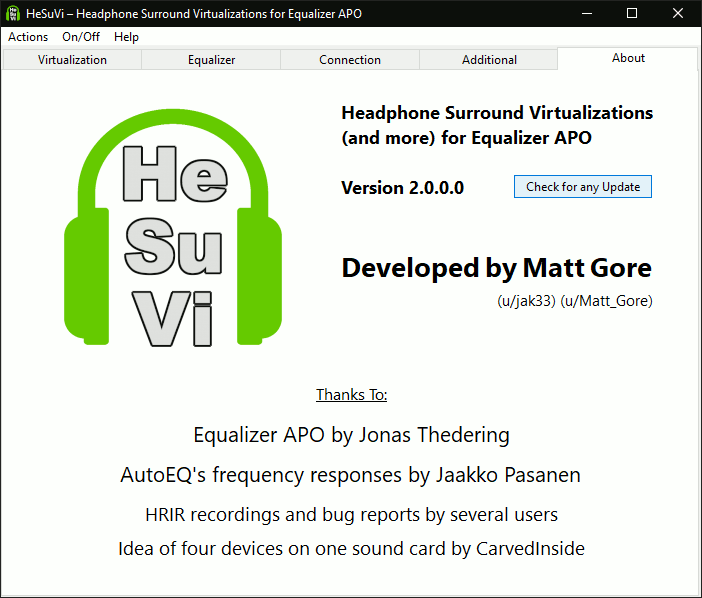
Who built it and who is it for
Developed by jak33 and hosted on SourceForge since 2018, HeSuVi is a Free Pascal application that runs on Windows 7 through Windows 11. It pulls roughly 8,000 downloads per week and carries a 5-out-of-5 rating on SourceForge. The tool is popular with competitive FPS gamers who need accurate positional audio, home theater enthusiasts watching 7.1 content through headphones, and audiophiles curious about different spatial rendering approaches. It requires Equalizer APO as a prerequisite, which handles the low-level audio processing.
Ready to hear the difference? Download HeSuVi or jump to Getting Started for setup instructions.
What Makes HeSuVi Different
HeSuVi packs the surround engines of commercial products into one free tool. Pick your HRIR, correct your headphone response, and fine-tune speaker placement — all without spending a cent.
Multi-HRIR Virtualization
Switch between Dolby Atmos, DTS Headphone:X, SBX Pro Studio, Sennheiser GSX, Windows Sonic, and more. Each profile was captured from real hardware, so you get genuine spatial cues instead of generic DSP effects.
1000+ Headphone EQ Presets
Built-in correction curves from oratory1990, Innerfidelity, and Headphone.com databases. Select your exact headphone model and HeSuVi flattens its frequency response before applying surround, so the spatial image stays accurate.
Speaker Position Adjustment
Drag individual virtual speakers around a 7.1 layout. Move the front-left closer, widen the rears, pull the center channel forward. Your spatial stage, your rules.
Stereo and 5.1 Upmix
Not everything ships as 7.1. HeSuVi upmixes stereo or 5.1 content to fill all eight channels before virtualizing, so older music and movies still get full spatial treatment.
Profile Management
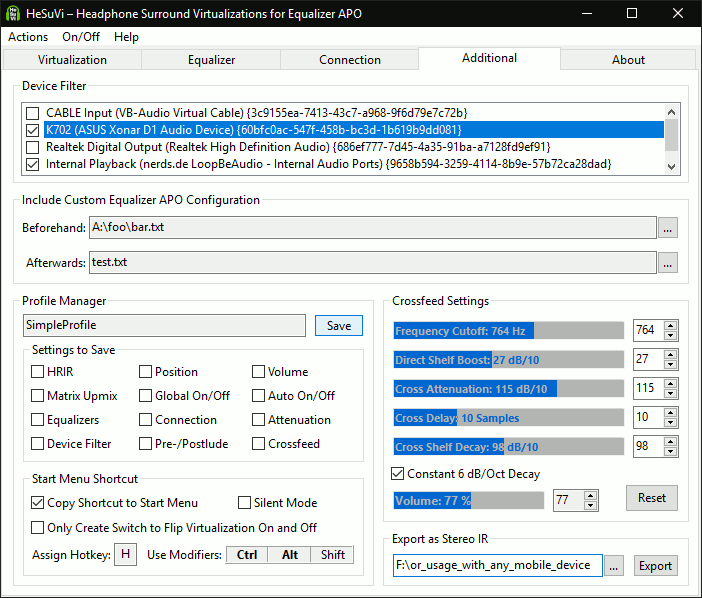
Save separate configs for gaming, movies, and music. Each profile stores the HRIR, EQ curve, speaker positions, and crossfeed settings. Hotkey switching lets you jump between them mid-session.
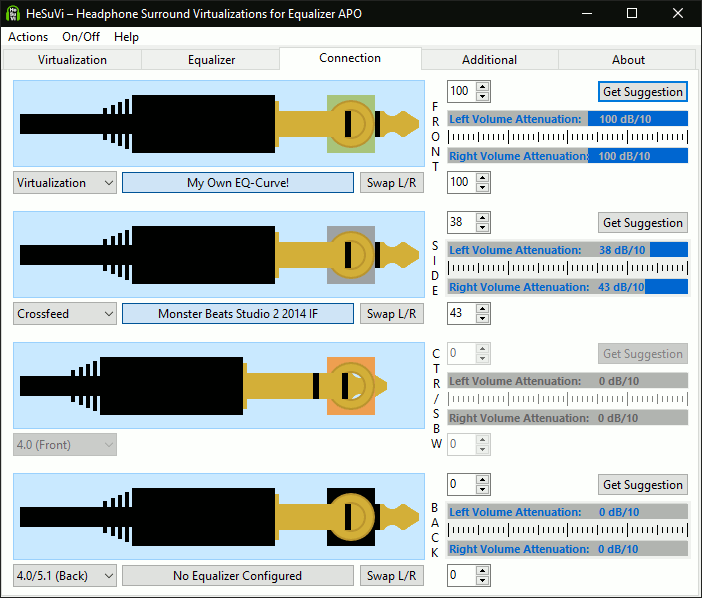
Crossfeed Blending
Strict left/right separation causes listener fatigue on headphones. Crossfeed bleeds a small amount of each channel into the opposite ear, mimicking how real speakers behave in a room.
Multi-Device Support
Run HeSuVi on more than one audio device at the same time. Assign different EQ toggles per device, so your USB headset and your DAC each get their own correction profile.
Volume Optimization
Convolution filters can push peaks above 0 dBFS. HeSuVi analyzes the output in real time and applies clipping protection, keeping loudness consistent without the distortion you would hear from a simple limiter.
Channel Swap (L/R)
Wear your headphones backwards by accident? Or dealing with a cable that reverses channels? One toggle swaps left and right without re-plugging anything.
Portable with One-Click Updates
No installer, no registry entries. Drop the folder anywhere and run it. When a new version appears, HeSuVi downloads and applies the update from inside the app itself.
HeSuVi runs on top of Equalizer APO and supports sample rates of 44.1 kHz and 48 kHz.
Download HeSuVi
Get the latest version of HeSuVi and start experiencing real 7.1 surround sound through any pair of stereo headphones. Free, open source, and regularly updated.
HeSuVi for Windows
Version 2.0.0.1 — Released January 28, 2019
Download HeSuViVersion 2.0.0.1 | 27.3 MB | WindowsDownloads from SourceForge — the official host for HeSuVi since 2018.
Prerequisite: Equalizer APO Required
HeSuVi relies on Equalizer APO for audio processing. You need to install Equalizer APO first and configure it for your playback device before HeSuVi will work. During Equalizer APO installation, select your headphone output device when prompted. HeSuVi handles the rest automatically once both programs are running.
Alternative Sources & Related Downloads
SourceForge Project Page
Browse all releases, wiki, and discussion forums
Equalizer APO 1.4 (64-bit)
Required dependency — 11.3 MB EXE installer
Equalizer APO 1.4 (32-bit)
For 32-bit Windows systems — 10.1 MB EXE installer
VB-Cable Virtual Audio
Optional — creates a virtual 7.1 device for full surround input
HeSuVi is hosted on SourceForge and scanned by their built-in malware detection system.
Screenshots
Browse the HeSuVi interface across its five main tabs — from surround virtualization controls to the built-in equalizer and multi-device configuration.
Screenshots from HeSuVi v2.0.0.1 running on Windows
System Requirements
Make sure your PC meets these specs before installing HeSuVi. The software is lightweight, but it does need Equalizer APO running first.
| Component | Minimum | Recommended |
|---|---|---|
| Operating System | Windows 7 (64-bit) | Windows 10 or 11 (64-bit) |
| Processor | Any dual-core CPU (1 GHz+) | Intel Core i3 / AMD Ryzen 3 or newer |
| RAM | 2 GB | 4 GB or more |
| Disk Space | 50 MB free | 100 MB free (for additional HRIR profiles) |
| Audio Device | Any stereo headphones or earbuds | Quality over-ear headphones with good driver range |
| Audio Backend | Equalizer APO installed and configured | Equalizer APO + VB-Cable virtual audio device |
| Sample Rate | 44.1 kHz stereo output | 48 kHz stereo output |
| Display | 1024 x 768 | 1920 x 1080 (some UI scaling issues on Hi-DPI) |
HeSuVi is a Windows-only application. Unlike Dolby Access or DTS Sound Unbound, it has no macOS or Linux port. Tested on Windows 7, 8, 8.1, 10, and 11.
Getting Started with HeSuVi
Everything you need to turn your regular headphones into a full 7.1 surround system. This guide covers the complete setup from first download to your first listening session.
Downloading HeSuVi
HeSuVi requires two pieces of software: Equalizer APO (the audio engine) and HeSuVi itself (the surround virtualization GUI). Both are free. You also need VB-Cable if your sound card does not natively support 7.1 output – most built-in sound cards fall into this category, so grab VB-Cable to be safe.
Head to our download section above to get all three files. The HeSuVi installer is about 27.3 MB and comes as a single .exe file (HeSuVi_2.0.0.1.exe). Equalizer APO is around 8 MB, and VB-Cable is roughly 1 MB. On a standard broadband connection, all three downloads finish in under a minute.
Only a Windows version exists. HeSuVi supports Windows 7 through Windows 11, both 32-bit and 64-bit. If you are on 64-bit Windows (most systems sold after 2010), download EqualizerAPO64-1.2.exe. For 32-bit, use the regular EqualizerAPO-1.2.exe. HeSuVi itself is a single universal build that works on both architectures.
There is no beta or nightly channel for HeSuVi. Version 2.0.0.1 from January 2019 is the current stable release and the only one available. It works well on Windows 11 despite the age of the release.
Installation Walkthrough
Install the three components in this exact order: VB-Cable first, then Equalizer APO, then HeSuVi. Skipping this order causes problems because Equalizer APO needs to detect VB-Cable during its setup, and HeSuVi needs to install into Equalizer APO’s directory.
Step 2a: Install VB-Cable. Extract the VB-Cable zip file and right-click VBCABLE_Setup_x64.exe (or VBCABLE_Setup.exe for 32-bit). Select Run as administrator. Click Install Driver in the window that appears. You will see “Installation Complete and Successful!” – click OK. Reboot your PC before continuing.
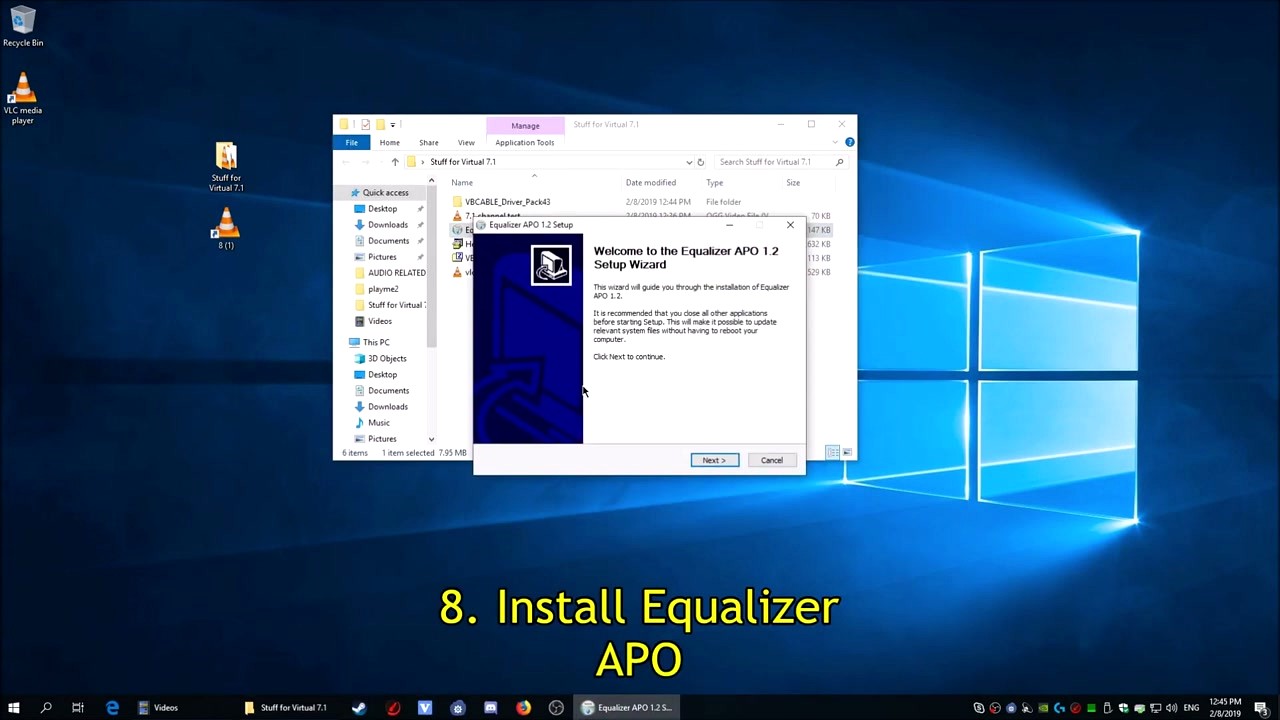
Step 2b: Install Equalizer APO. Run the Equalizer APO installer. The setup wizard walks you through a standard Next > Next > Install sequence. The key moment comes at the Configurator window after installation finishes. This screen lists every audio device on your system.
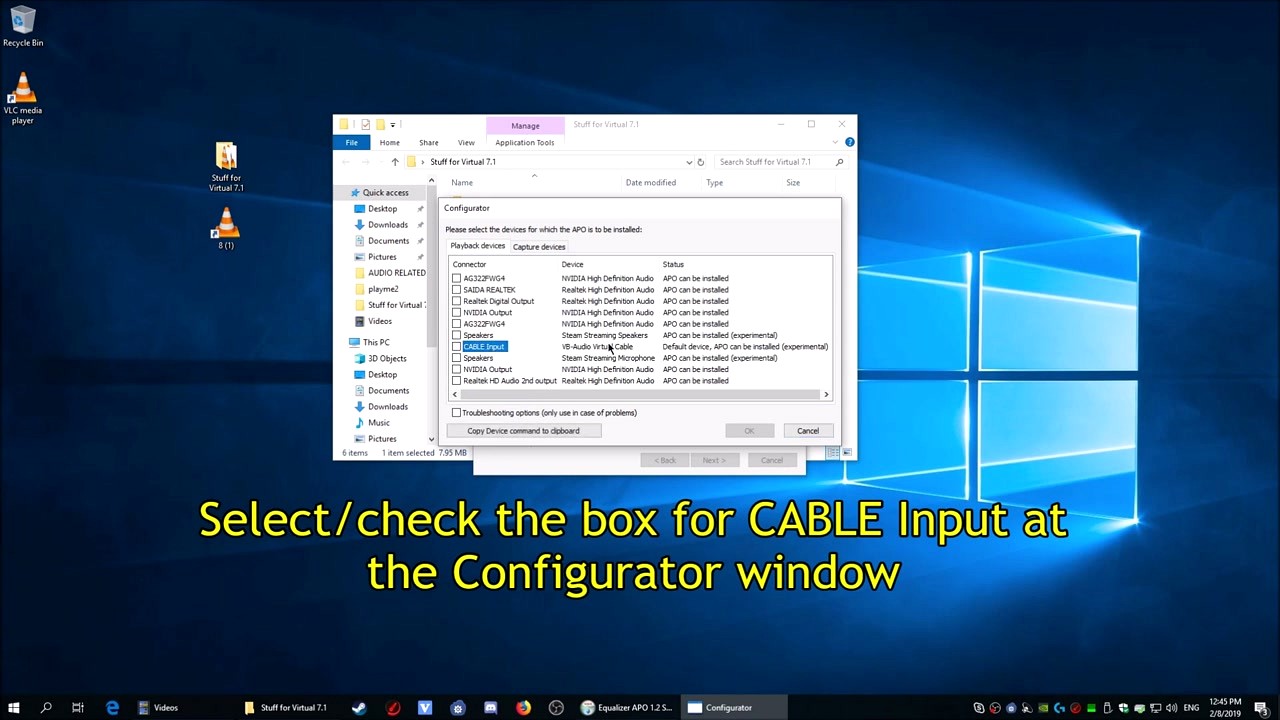
In the Configurator, find CABLE Input (listed under VB-Audio Virtual Cable) and tick the checkbox next to it. The Status column should show “Default device, APO can be installed.” You can also check your actual headphone device if you want EQ on it later. Click OK when done. Do not reboot yet.
Step 2c: Install HeSuVi. Run HeSuVi_2.0.0.1.exe. The installer asks where to unpack – point it to the Equalizer APO installation directory, typically C:\Program Files\EqualizerAPO. HeSuVi extracts itself and launches the GUI automatically.
After HeSuVi launches, go to Actions > Restart Audio Service in the menu bar. This activates Equalizer APO without requiring a full system reboot. If audio stops working or sounds distorted at any point, use this same menu option to reset things.
Initial Setup & Configuration
With all three programs installed, you need to configure Windows audio routing so surround sound flows through VB-Cable into HeSuVi and out to your headphones.
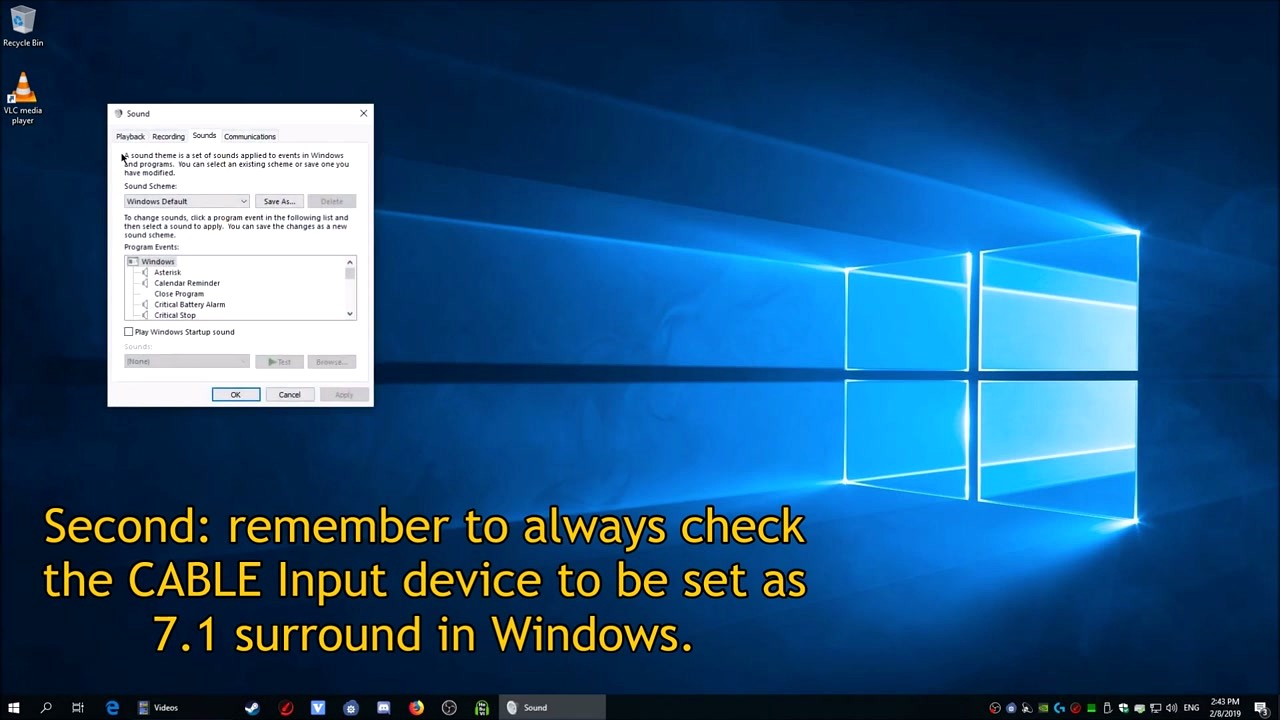
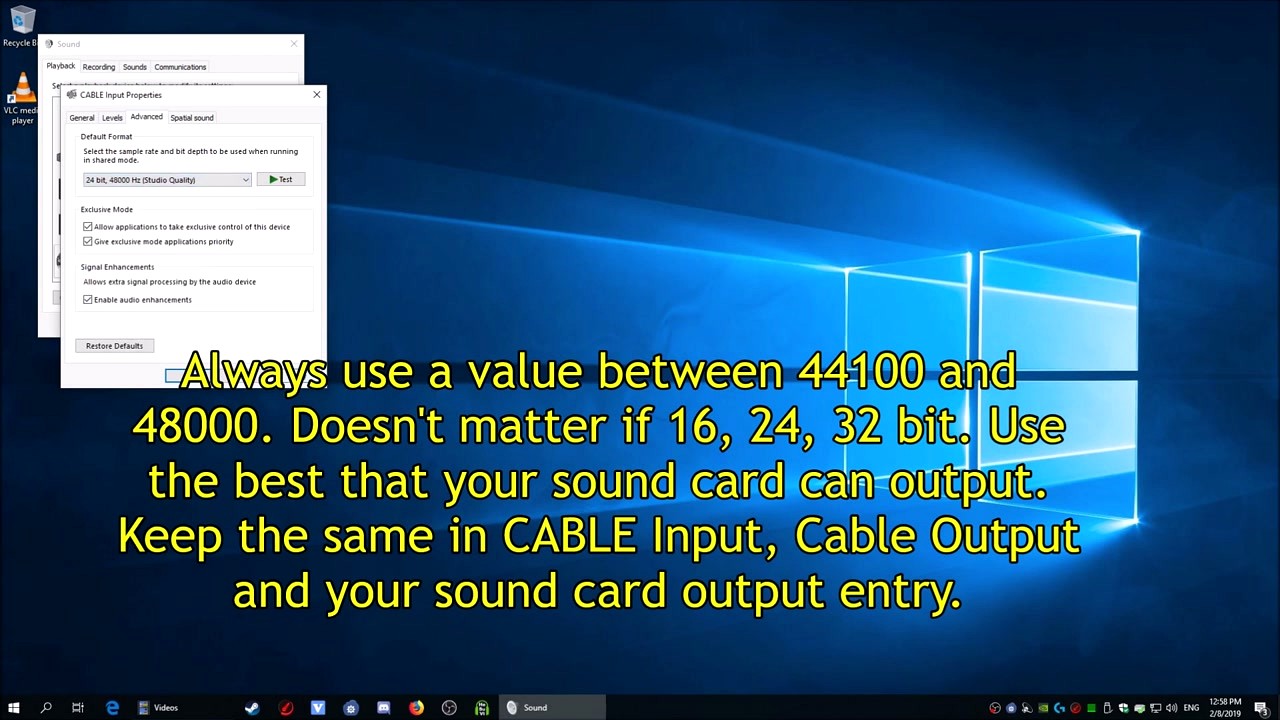
Set CABLE Input as your default playback device. Open Windows Sound settings (right-click the speaker icon in the taskbar > Sounds, or use HeSuVi’s Actions > Open Windows Sound Panel). In the Playback tab, right-click CABLE Input and select Set as Default Device. Then right-click it again, select Properties > Advanced, and set the Default Format to 24 bit, 48000 Hz (Studio Quality).
Configure CABLE Input for 7.1 surround. Still on CABLE Input, click Configure at the bottom-left of the Sound panel. Select 7.1 Surround and click through the wizard. This tells Windows to send 8-channel audio to VB-Cable, which Equalizer APO then processes.
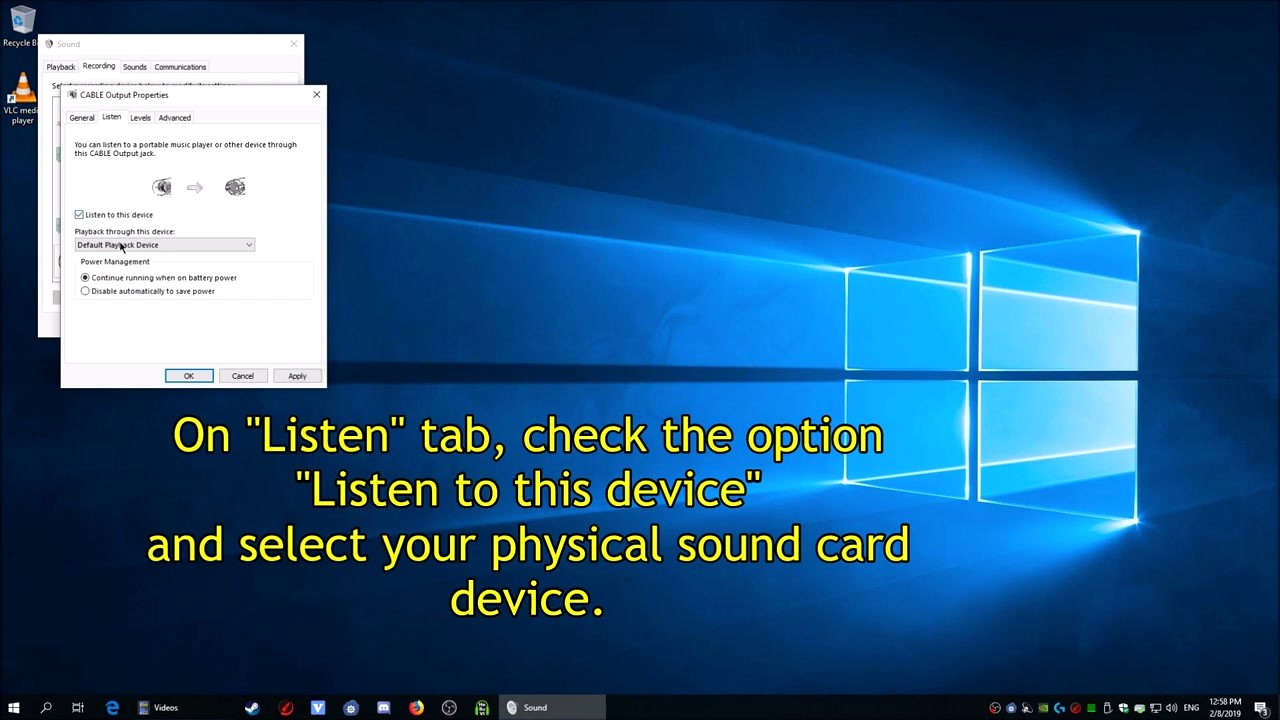
Route audio to your headphones via CABLE Output. Switch to the Recording tab, right-click CABLE Output, and choose Properties. Go to the Listen tab, check Listen to this device, and select your actual headphones or sound card from the dropdown. Click Apply. Audio now flows: Windows apps > CABLE Input (7.1) > Equalizer APO + HeSuVi (processing) > CABLE Output > your headphones (stereo).
Your First Surround Session
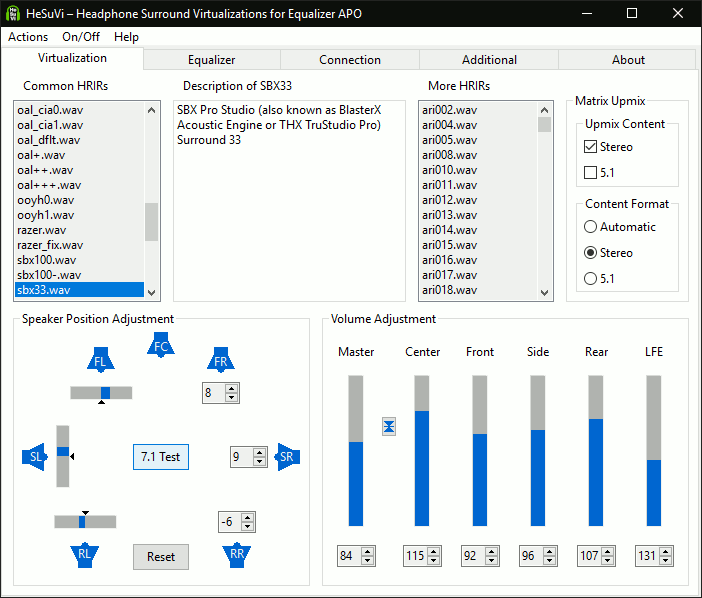
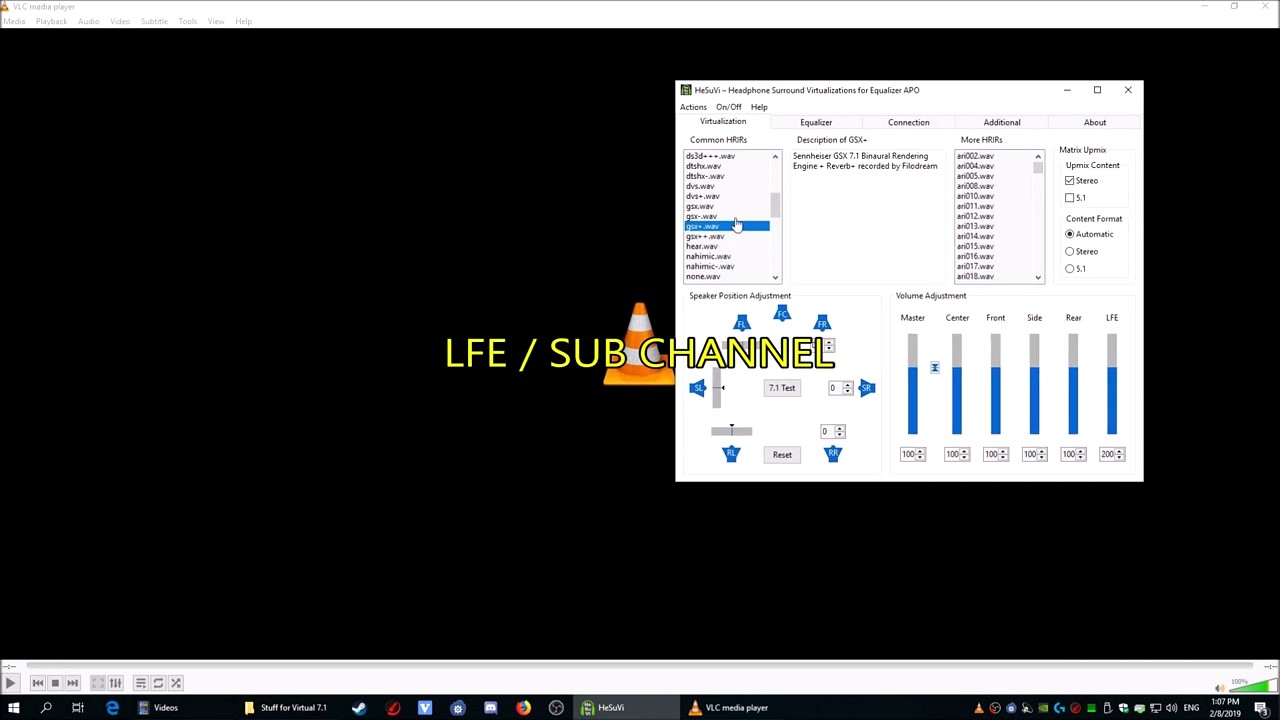
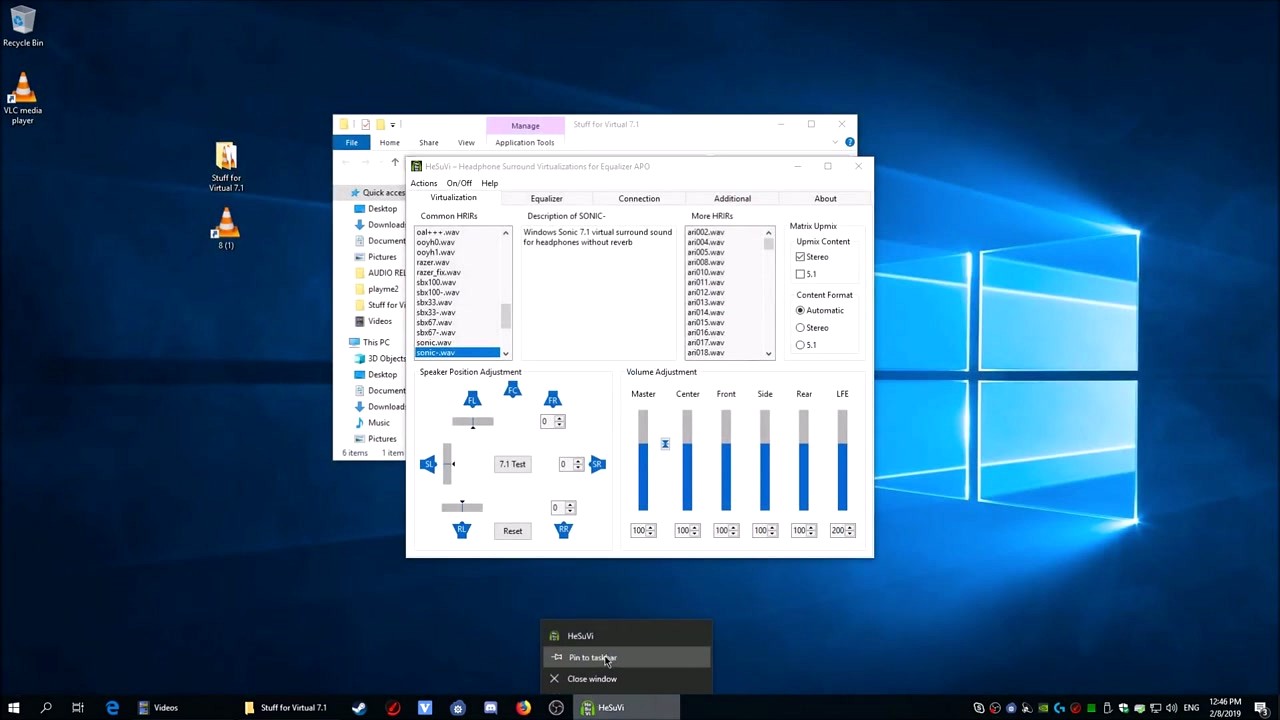
Open HeSuVi and look at the Virtualization tab. On the left, you see the Common HRIRs list with files like dolby_atmos.wav, dts_hpx.wav, sbx33.wav, and sonic.wav. Each file is a different surround sound algorithm. Click one to select it – HeSuVi applies the change instantly with no restart needed.
Here is a quick rundown of the most popular profiles and what they sound like:
- sbx33.wav or sbx100-.wav – Creative SBX Pro Studio. Wide soundstage, good for gaming. One of the community favorites.
- dolby_atmos.wav – Dolby Atmos for Headphones profile. Natural-sounding with accurate positioning. Good all-rounder.
- dts_hpx.wav – DTS Headphone:X. Punchy bass, immersive for movies.
- sonic.wav – Windows Sonic. Subtle and clean. Works well for music.
- gsx+.wav – Sennheiser GSX. Tight imaging, preferred by competitive FPS players.
To test if surround is working, click the 7.1 Test button in the Speaker Position Adjustment area. You should hear a tone rotating around your head through all eight channels. If the tone only plays in left and right, your Windows audio is not set to 7.1 – go back to the Sound panel and re-run the Configure wizard on CABLE Input.
The Speaker Position Adjustment panel shows FL, FC, FR, SL, SR, RL, RR nodes around a headphone icon. You can drag the sliders to move virtual speaker positions closer or further from your head. Most people leave these at default, but if surround feels too wide or narrow, try pulling the side speakers (SL/SR) inward.
The Volume Adjustment sliders on the right let you control Master, Center, Front, Side, Rear, and LFE (subwoofer) levels independently. If dialogue sounds quiet in movies, bump up the Center channel by 10-20%. If explosions are too bass-heavy, lower the LFE channel.
Once you find a combination you like, go to the Additional tab and use the Profile Manager to save your setup. Click Save, give it a name like “Gaming” or “Movies,” and you can switch between profiles later with a single click.
Tips, Tricks & Best Practices
Use the Equalizer tab for headphone correction. HeSuVi includes over 1,000 headphone EQ presets from oratory1990 and AutoEQ. Go to the Equalizer tab, click the dropdown, and search for your headphone model. This flattens your headphone’s frequency response before the surround processing kicks in, which makes the spatial effect more accurate. If your specific model is not listed, try one from the same manufacturer.
Avoid stacking EQ tools. If you also use Peace Equalizer or another Equalizer APO frontend, be careful about running both simultaneously. HeSuVi writes its own configuration to Equalizer APO’s config file. Reddit users on r/headphones generally recommend using Peace for pure EQ tasks and HeSuVi only for surround virtualization – not both EQ panels at once.
Common mistake: forgetting to switch back. CABLE Input stays as your default device even after you close HeSuVi. If you stop hearing audio after a reboot, check that CABLE Input is still the default and that the “Listen to this device” option on CABLE Output is still enabled. Some Windows updates reset these.
Crossfeed for stereo music. The Additional tab has crossfeed settings that blend a small amount of the left channel into the right and vice versa. This makes stereo music (which was mixed for speakers) sound more natural on headphones. Set the crossfeed value between 5 and 15 for a subtle effect.
Where to get help. The HeSuVi Wiki on SourceForge has the official setup guide. Reddit’s r/headphones community is active and has a pinned FAQ that covers HeSuVi. For troubleshooting, the SourceForge discussion forum is where the developer (jak33) sometimes responds directly.
Ready to transform your headphone audio? Grab the files and follow the steps above.
Download HeSuViFrequently Asked Questions
Answers to the most common questions about HeSuVi, from setup basics to advanced tuning.
Is HeSuVi safe to download and install?
Yes, HeSuVi is safe. The project is hosted on SourceForge and has been downloaded hundreds of thousands of times since 2018 with no reported malware incidents. The installer (HeSuVi_2.0.0.1.exe, 27.3 MB) is a standard Windows executable built with Free Pascal.
SourceForge scans all hosted files for malware automatically. The HeSuVi project page maintains a 5/5 star rating across all user reviews. The application does not collect telemetry, phone home, or access the internet during normal operation. It modifies audio settings through Equalizer APO’s configuration files, which sit in your Program Files directory.
Pro tip: Always download from the official SourceForge project page rather than third-party mirror sites. Some repackaged versions on random download portals bundle adware that has nothing to do with HeSuVi itself.
Check our download section for the verified direct link to the official installer.
Is HeSuVi free to download?
HeSuVi is 100% free with no paid tiers, subscriptions, or feature locks. Every HRIR profile, every EQ preset, every feature in the application is available at no cost. This is a key advantage over commercial alternatives like Dolby Access ($14.99) and DTS Sound Unbound ($19.99).
The software is open-source and developed by jak33 as a community project. Equalizer APO, which HeSuVi depends on, is also free and open-source. The only optional paid component in the full setup is VB-Cable’s extended versions, but the free VB-Cable release handles the virtual audio device requirement without issues for most users.
Pro tip: HeSuVi gives you access to HRIR recordings from premium surround engines (Dolby Atmos, DTS Headphone:X, SBX Pro Studio, Waves Nx) that normally require paid software or specific hardware. That alone makes it worth the setup time.
See our features section for the full list of included surround profiles.
What is HeSuVi and what does it do?
HeSuVi is a headphone surround virtualization tool that converts 7.1-channel audio into binaural stereo. Put simply, it makes your regular stereo headphones produce convincing positional surround sound by applying Head-Related Impulse Response (HRIR) filters.
When a game or movie outputs 7.1 surround audio, HeSuVi intercepts each channel (front left, front right, center, side left, side right, rear left, rear right, and subwoofer) and processes them through convolution filters that simulate how sound reaches your ears from different directions. Your brain interprets the result as sounds coming from specific positions around you, not just left and right.
HeSuVi ships with HRIR profiles captured from commercial surround systems:
- Dolby Atmos for Headphones
- DTS Headphone:X
- SBX Pro Studio Surround
- CMSS-3D
- Sennheiser GSX Binaural 7.1
- Windows Sonic for Headphones
- Waves Nx
On top of surround virtualization, it includes a graphic equalizer with presets for over 1,000 headphone models, crossfeed controls, speaker position adjustment, and profile management. It processes audio at 44.1 kHz or 48 kHz sample rates.
Pro tip: Start with the SBX Pro Studio profile for gaming – most users on r/headphones consider it the best balance of positional accuracy and sound quality.
Head to our getting started guide for step-by-step setup instructions.
What are the system requirements for HeSuVi?
HeSuVi runs on Windows 7, 8, 8.1, 10, and 11 (both 32-bit and 64-bit). It needs very little in terms of hardware since the audio processing is handled by Equalizer APO’s efficient convolution engine.
The actual requirements break down like this:
- OS: Windows 7 SP1 or later
- Prerequisite: Equalizer APO (free, must be installed first)
- Audio output: Any stereo headphones or earbuds
- Audio input: Sound card with 7.1 output capability, or VB-Cable virtual audio device
- RAM: Under 100 MB in use
- Disk: About 50 MB installed
- CPU: Any modern processor handles the convolution without noticeable load
Most users need VB-Cable because standard onboard sound cards (Realtek, etc.) only expose stereo output. VB-Cable creates a virtual 7.1 audio device that feeds into Equalizer APO. The entire chain is: Game/App → VB-Cable (7.1) → Equalizer APO + HeSuVi (convolution) → Headphones (stereo).
Pro tip: If your sound card or DAC already supports a 7.1 channel configuration in Windows Sound settings, you can skip VB-Cable entirely. This is common with Creative, ASUS Xonar, and some gaming motherboard audio chipsets.
Check our system requirements table for the full breakdown.
Does HeSuVi work on Windows 11?
Yes, HeSuVi works on Windows 11 without any special compatibility settings. Both HeSuVi (version 2.0.0.1) and Equalizer APO run natively on Windows 11 22H2 and 23H2. Users on Reddit and the SourceForge forums confirm stable operation on the latest Windows 11 builds.
One thing to watch for on Windows 11: the spatial audio settings in the Sound control panel. Windows 11 has its own built-in spatial audio options (Windows Sonic, Dolby Atmos). If you have one of those enabled system-wide, it can conflict with HeSuVi’s processing. Before running HeSuVi, right-click your sound output device in the system tray, go to Spatial Sound, and set it to Off. Let HeSuVi handle the spatialization instead.
The Equalizer APO installation wizard on Windows 11 sometimes shows a warning about the audio driver. This is normal. Select your playback device (headphones), click Install, and reboot. After the reboot, Equalizer APO hooks into the audio pipeline correctly.
Pro tip: If HeSuVi stops working after a major Windows 11 update, reinstall Equalizer APO. Windows updates occasionally reset audio driver hooks, and a fresh Equalizer APO install restores them in under a minute.
Follow our getting started guide for the full Windows 11 installation walkthrough.
Does HeSuVi work on Mac or Linux?
No, HeSuVi is Windows-only. It is a Free Pascal application compiled for Windows and depends on Equalizer APO, which is also exclusive to Windows. There is no macOS or Linux port, and running it through Wine or Proton is not officially supported because Equalizer APO hooks into the Windows audio driver stack at the kernel level.
If you are on macOS, consider these alternatives for headphone surround:
- Dolby Access (if you have an Apple Silicon Mac with spatial audio support)
- Boom 3D – paid macOS audio enhancer with virtual surround
For Linux users, there are community projects that adapt HeSuVi’s HRIR files for PulseAudio:
- PulseAudio’s
virtual-surround-sinkmodule can load HeSuVi’s impulse response WAV files directly - A merge request by a Reddit user improved this module’s performance and removed the 64-sample processing limit
Pro tip: If you dual-boot Windows and Linux, install HeSuVi on the Windows side for gaming and movies. Export your preferred HRIR profile from HeSuVi’s installation folder and load it into PulseAudio on Linux for a similar (if less polished) experience.
See our download section for the Windows installer.
How do I install HeSuVi step by step?
Installing HeSuVi requires three components installed in a specific order: VB-Cable first, then Equalizer APO, then HeSuVi. The entire process takes about 10 minutes.
- Install VB-Cable: Download VB-Cable from vb-audio.com. Extract the ZIP, right-click
VBCABLE_Setup_x64.exe, select Run as Administrator, and click Install Driver. This creates a virtual 7.1 audio device in Windows. - Install Equalizer APO: Run the Equalizer APO installer. When the Configurator window appears, check the box next to your real headphone output device (e.g., “Speakers – Realtek Audio”). Click OK, then reboot your PC.
- Install HeSuVi: Run
HeSuVi_2.0.0.1.exe. It auto-detects Equalizer APO’s installation directory and places itself there. No reboot needed for this step. - Configure Windows Sound: Open Sound settings (right-click speaker icon → Sound settings). Set your VB-Cable as the default playback device in apps/games. Set your real headphones as the default in Equalizer APO.
- Launch HeSuVi: Open HeSuVi, select a virtualization profile (try SBX Pro Studio first), and hit Play 7.1 Surround Test Audio to verify everything works.
Pro tip: After installing VB-Cable, go to Sound settings → VB-Cable → Properties → Advanced, and set the format to 7.1 Surround, 48000 Hz. This ensures full channel output before it hits Equalizer APO.
Our getting started section has screenshots for each step.
How to fix HeSuVi not working or no sound?
The most common cause is incorrect audio device routing. HeSuVi needs a specific signal chain: your app outputs to VB-Cable (7.1), Equalizer APO processes it with HeSuVi’s HRIR filters, and the result goes to your headphones. If any link in that chain is misconfigured, you get silence or unprocessed audio.
Run through this checklist:
- Check default playback device: In Windows Sound settings, make sure VB-Cable is set as the default output for the app producing audio (games, media players).
- Verify Equalizer APO target: Open Equalizer APO’s Configurator and confirm your headphone output device has a green checkmark. If not, check it and reboot.
- Check VB-Cable channel format: Right-click VB-Cable in Sound settings → Properties → Advanced. It must be set to 7.1 Surround at 48000 Hz (or 44100 Hz). If it shows Stereo, HeSuVi receives only 2 channels and virtualization does nothing useful.
- Verify HeSuVi is running: Open HeSuVi. The status bar at the bottom should show the active HRIR. Click “Play 7.1 Surround Test Audio” to test.
- Disable Windows Spatial Sound: Right-click your headphone output → Spatial Sound → set to Off. Windows Sonic or Dolby Atmos conflicts with HeSuVi’s processing.
Pro tip: If HeSuVi worked before and suddenly stopped after a Windows update, reinstall Equalizer APO. Windows updates sometimes unhook the APO driver from your audio device. A quick reinstall (2 minutes) fixes it every time.
See our getting started guide for the correct audio routing setup with screenshots.
How do I update HeSuVi to the latest version?
HeSuVi has a built-in one-click update feature. Open HeSuVi, and in the main menu look for the update option. It checks the SourceForge repository and downloads newer files directly. Your profiles, EQ presets, and settings are preserved during updates.
The current latest version is 2.0.0.1, released January 28, 2019. This version introduced updated HRIR files for Waves Nx and Dolby Virtual Speaker, plus improved EQ presets for additional headphone models. While the version number has not changed since 2019, the update mechanism can pull newer HRIR files and EQ presets that are published separately from the main release.
For a manual update: download the latest HeSuVi_2.0.0.1.exe from SourceForge and run it. It installs over the existing copy. Your saved profiles in the HeSuVi directory are not overwritten.
Pro tip: The SourceForge updateonly folder contains lighter update packages with just the changed files, useful if you want to update specific HRIR profiles without re-downloading the full 27.3 MB installer.
Grab the latest version from our download section.
How to uninstall HeSuVi completely?
HeSuVi does not have a traditional uninstaller because it installs as a set of files inside Equalizer APO’s directory. To remove it cleanly:
- Close HeSuVi if it is running.
- Navigate to your Equalizer APO installation folder (usually
C:\Program Files\EqualizerAPO). - Delete the
HeSuVisubfolder. This removes the application, all HRIR files, and saved profiles. - In Equalizer APO’s
configfolder, openconfig.txtand remove any lines that reference HeSuVi include files.
If you also want to remove Equalizer APO and VB-Cable, uninstall Equalizer APO through Windows Settings → Apps → Installed apps. For VB-Cable, run its setup executable again and click Uninstall Driver.
After removing all three, your audio routing returns to the default Windows configuration. No registry entries or system files are left behind by any of these programs.
Pro tip: Before uninstalling, export your favorite HeSuVi profile using the Profile Manager’s Save function. If you reinstall later, you can load it back without reconfiguring everything from scratch.
Does HeSuVi work offline?
Yes, HeSuVi works entirely offline. After installation, the software processes audio locally using the HRIR files stored on your hard drive. It does not require an internet connection to apply surround virtualization, load EQ presets, or switch profiles.
The only online feature is the optional update check, which queries SourceForge for newer files. If you skip the update, HeSuVi runs without ever contacting a server. This makes it suitable for isolated audio workstations, LAN party setups, and machines without regular internet access.
All HRIR profiles (Dolby Atmos, DTS Headphone:X, SBX Pro Studio, and the rest) ship with the installer. The 1,000+ headphone EQ presets are bundled too. Nothing is streamed or downloaded on demand.
Pro tip: HeSuVi is also portable. Copy the entire HeSuVi folder to a USB drive, and you can run it on any Windows PC that has Equalizer APO installed, without a separate installation step.
Visit our features section for the full list of bundled HRIR profiles and EQ presets.
Which HRIR profile sounds best in HeSuVi?
SBX Pro Studio (sbx33.wav) is the most popular choice among HeSuVi users, especially for gaming. It offers strong positional accuracy without making the audio sound hollow or overly processed. Reddit’s r/headphones community consistently recommends it as the starting point.
That said, the “best” profile depends on what you are doing:
- FPS gaming: SBX Pro Studio or CMSS-3D – clear directional cues for footsteps and gunshots
- Movies and music: Dolby Atmos for Headphones or DTS Headphone:X – wider soundstage, more natural room feel
- Minimal processing: Windows Sonic – lightest touch, closest to flat stereo with subtle spatialization
- Maximum immersion: Sennheiser GSX Binaural 7.1 – pronounced surround effect, great for cinematic content
HeSuVi ships with dozens of HRIR profiles. Switching between them takes a single click in the Virtualization panel. Try each one with your own headphones, because how a profile sounds varies significantly between headphone models. Open-back headphones like the AKG K702 or Sennheiser HD600 generally produce better spatialization than closed-back models.
Pro tip: After picking an HRIR, use the Equalizer tab to load a correction preset for your specific headphone model. Combining the right HRIR with headphone-specific EQ correction is where HeSuVi really outperforms paid alternatives like Dolby Access.
Check our features section for the complete list of included profiles.
HeSuVi vs Dolby Atmos for Headphones – which is better?
HeSuVi offers more flexibility and customization at zero cost, while Dolby Atmos for Headphones ($14.99) provides a simpler plug-and-play experience. Which one is “better” depends on how much time you want to spend configuring your audio.
Key differences:
- Price: HeSuVi is free. Dolby Atmos for Headphones costs $14.99 through the Microsoft Store.
- HRIR variety: HeSuVi includes HRIR profiles from multiple surround engines (including Dolby Atmos itself). Dolby Access only uses its own Dolby profile.
- EQ integration: HeSuVi has a built-in equalizer with 1,000+ headphone presets. Dolby Access has basic EQ but no headphone-specific corrections.
- Height channels: Dolby Atmos for Headphones supports object-based height channels (7.1.4) in games that use the Dolby Atmos renderer. HeSuVi works with standard 7.1 channel layouts only.
- Setup complexity: Dolby Access installs and works in minutes. HeSuVi requires Equalizer APO and VB-Cable, plus audio routing configuration.
For competitive FPS gaming, many users prefer HeSuVi with the SBX Pro Studio profile for sharper positional cues. For casual gaming with Atmos-enabled titles (like Overwatch 2, Cyberpunk 2077), Dolby Access handles height channels that HeSuVi cannot replicate.
Pro tip: You can run both. Use Dolby Atmos for games that natively support it, and HeSuVi (via VB-Cable routing) for everything else. They do not conflict as long as you disable Windows Spatial Sound when using HeSuVi.
Does HeSuVi cause audio latency?
HeSuVi adds negligible latency. Equalizer APO processes audio at the driver level using convolution, which introduces roughly 1-5 milliseconds of delay depending on your buffer settings and sample rate. This is imperceptible to human hearing and does not affect gaming performance or lip-sync in movies.
The processing chain (VB-Cable → Equalizer APO → Headphones) adds two extra stages compared to direct output, but each stage operates in real-time with very small buffers. At 48 kHz with default settings, the total added latency stays well under 10 ms. Professional audio production typically considers anything under 10 ms to be “real-time.”
If you are sensitive to latency (rhythm games, music production), you can reduce the buffer size in Equalizer APO’s configuration. Smaller buffers mean lower latency but slightly higher CPU usage – though on any modern processor, the difference is trivial.
Pro tip: If you notice audio desync in videos, the issue is usually VB-Cable’s sample rate not matching your media player, not HeSuVi itself. Set VB-Cable to 48000 Hz in Windows Sound settings and configure your player to output at the same rate.
See our system requirements for recommended audio settings.
Why does HeSuVi sound muffled or hollow?
Muffled sound usually means the HRIR profile is interacting poorly with your headphone’s natural frequency response. Every headphone model has peaks and dips at different frequencies. When an HRIR filter (which also shapes frequency response) compounds those dips, you get a muddy or hollow result.
Fix it with these steps:
- Apply headphone EQ: In HeSuVi’s Equalizer tab, find your headphone model in the preset list (1,000+ models available from oratory1990, Innerfidelity, and Headphone.com measurements). This flattens your headphone’s frequency response before the HRIR processing.
- Try a different HRIR: Not every HRIR suits every headphone. If Dolby Atmos sounds muffled, switch to SBX Pro Studio or CMSS-3D. The spatial character is different for each one.
- Adjust speaker positions: In the Speaker Position Adjustment panel, tweak the angle values. Moving virtual speakers closer to center can reduce the hollow “distant” quality.
- Check sample rate: Mismatched sample rates between VB-Cable and Equalizer APO cause quality loss. Both should be set to 48000 Hz, 24-bit.
Pro tip: Use the Volume Optimization feature (“Get Suggestion”) to prevent clipping. Applying both EQ and HRIR can push some frequencies into distortion territory. The optimizer sets your gain so the loudest signal stays below the clipping threshold.
Our getting started guide covers EQ setup in detail.
Where is the official download for HeSuVi?
The official download is hosted on SourceForge at the HeSuVi project page. The file you want is HeSuVi_2.0.0.1.exe (27.3 MB). This is the only legitimate source maintained by the developer jak33.
Avoid downloading HeSuVi from third-party sites like Softonic, CNET Download, or random “free download” portals. These sites often repackage open-source software with bundled adware, toolbars, or modified installers. The SourceForge version is clean and verified.
You also need Equalizer APO, which is a separate download from its own SourceForge project page. And optionally VB-Cable from vb-audio.com if your sound card does not natively support 7.1 output.
Pro tip: Bookmark the SourceForge files page for HeSuVi. When updates drop (new HRIR profiles or EQ presets), they appear in the updateonly subfolder before a full release is packaged.
We provide direct links to all three downloads in our download section.
How do I use the equalizer for my specific headphones?
HeSuVi includes EQ correction presets for over 1,000 headphone models. Open the Equalizer tab, and on the right side you will see a scrollable list organized by manufacturer and measurement source (oratory1990, Innerfidelity, Headphone.com).
To apply a preset:
- Click the Equalizer tab in HeSuVi.
- Make sure the ON button is active (green border).
- Scroll the preset list on the right and find your headphone model. Type the first letter to jump to that section.
- Click your model name. The graphic equalizer sliders will adjust automatically.
- Play music and listen. If the result is too bright or too warm, use the Flatten button and make manual adjustments.
The presets target a neutral frequency response based on the Harman target curve. This means they correct your headphones’ natural peaks and dips to produce a flatter, more accurate sound before the HRIR processing kicks in. The combination of headphone correction + surround virtualization is what makes HeSuVi sound better than most paid alternatives out of the box.
Pro tip: If your exact headphone model is not listed, search for a similar model from the same manufacturer. For example, if you have the HyperX Cloud II, look for the Takstar Pro 80 preset since the Cloud II uses the same driver. The oratory1990 presets are generally the most accurate.
See our features overview for more on the EQ system.
Can I use HeSuVi with multiple audio devices?
Yes, HeSuVi supports multiple audio devices through its Connection tab. You can set up separate EQ and virtualization profiles for different headphones, speakers, or DACs connected to your PC.
In the Connection tab, each detected audio device appears with its own toggle for equalization. You can enable HeSuVi processing on one device while leaving others untouched. This is useful if you switch between headphones for gaming and speakers for general use – HeSuVi only processes the device you want.
The Profile Manager (visible in the bottom-right of the main window) lets you save complete configurations per device. Create a “Gaming – HD600” profile with SBX Pro Studio and the HD600 EQ preset, and a separate “Movies – DT770” profile with Dolby Atmos and DT770 correction. Switch between them with a single click or a configured hotkey.
Pro tip: Set up keyboard hotkeys in the Additional tab for your most-used profiles. This lets you swap surround configurations mid-game without alt-tabbing to the HeSuVi window.
Check our features section for details on profile management and hotkey support.
Still have questions? Visit the HeSuVi Wiki or check our getting started guide.